It's been a while but I've been busy since my last post in April, was kinda consumed by planning our wedding and trip to the UK with the boys in June ... ya I know, lots of fun stuff right? Then the summer came and went, back to school rush hit, Thanksgiving and now we are gearing up for Halloween!
I plan to add in some posts and pics from the wedding and our travels but wanted to jump back in with a new favourite in our house .... Chewy Peanut Butter Cookies! Zac has never really like Peanut Butter and actually used to tell people he was allergic to nuts when he was little, fast forward a few years and he met and fell in love with Peanut Butter Cups and the rest is history!
I called mom for her Peanut Butter recipe because I didn't want to use the one on the side of the Kraft PB Jar, they are nice and nutty but they are too crumbly and the request came in rather specific .... "Chewy peanut butter cookies please!". Mom gave me the recipe from her Five Roses cook book and I made a few modifications .... dropped the amount of butter and upped the PB for the extra nuttiness and added in an extra egg for the chewiness. Below is the recipe that passed the Boy Test in my house ... if they don't eat baked goods then it's bad .... brutal truth!
Ingredients
1/4 cup Butter (*salted or unsalted, just cut out the salt below if you are using salted)
1/2 cup Brown Sugar
1/2 cup White Sugar
2 Eggs
1 cup cup Peanut Butter
1/2 tsp Salt *
3/4 tsp Baking Soda
1 1/2 cup Flour
1/2 tsp Vanilla
Using a mixer cream butter, add in sugar and continue to cream until light and fluffy
Add in eggs, peanut butter and vanilla and mix
Add salt* and baking powder and mix
Set aside mixer and mix flour in by hand until incorporated
Roll batter into 1 inch balls and place on parchment lined cookie sheet, sprinkle with white sugar
Bake in a preheated 350 degree oven for 10-12 minutes or until the edges are ever so slightly golden brown, pull them out even if you think they aren't done (this will keep the chewiness!!!) Let them cool on a rack or backing sheet before storing.
These aren't your traditional fork printed PB Cookie but they are chewy and nutty ..... and never last long! Enjoy.
Showing posts with label Desserts. Show all posts
Showing posts with label Desserts. Show all posts
October 19, 2012


April 02, 2012
Aunt Sharon's Banana Bread

Here's a tip from my cousin Amber, mash up your old bananas and measure them into 1 cup portions, throw them into ziplock bags for storage until you are ready to bake and voila .... premashed, premeasured and ready to go!
Ingredients
2-3 medium ripe bananas, mashed
1/2 cup of butter, softened
2 eggs
1/2 cup of buttermilk
splash of vanilla
2 cups of flour
1 tsp of soda
1/2 tsp of salt
1/2 cup of walnuts
Combine the wet ingredients
Add dry ingredients except the nuts and mix well until combined
Add walnuts if desired
Bake at 350 .....
Loaf Pan - 1 hour, 10 minutes
Mini Loaf Pan - 55 minutes
Large Bar Pan - 18 to 20 minutes
YUMMY!!!! Enjoy!
December 19, 2011
My Little BIG Cheesecakes
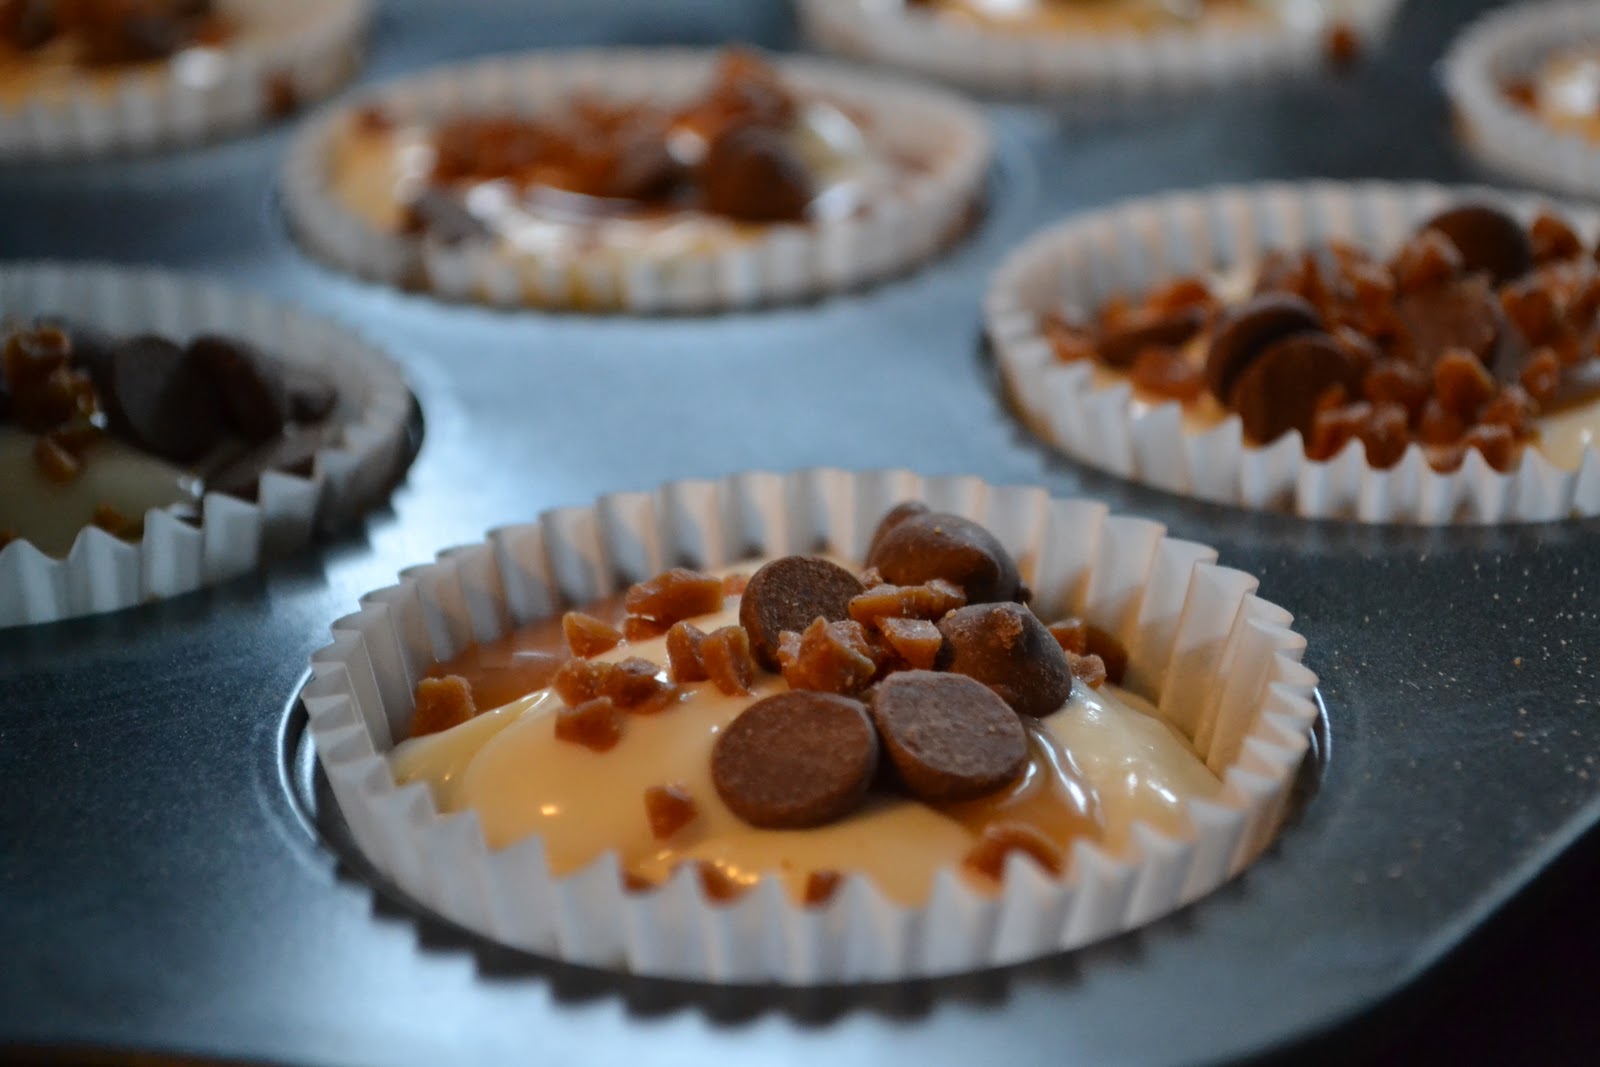
These guys might be smaller but there is no scrimping on taste!!! My Little BIG Cheesecakes are big New York style cheesecake taste packed in little muffin size servings. These are perfect for parties and gatherings that make plating and serving a traditional cheesecake somewhat difficult. Instead of a shortbread crust that can be crumbly when eaten off of a plate, I have used a round Nilla cookie in the bottom of each muffin cup. This gives you the look and feel of a crust without the mess! Any topping can be added to create variation in your menu options but be sure to swirl in jam, fruit coulis etc. to ensure even baking.
 I made these today for Steve to take as nibblies at the office tomorrow. One batch had to be strawberry just to keep it festive and the other was a simple chocolate and caramel combo. I`m hoping they are a hit but if not it means they may just make it back home at the end of the day. We sampled one of the strawberry lovelies after they had cooled and I have to say .... I am pretty excited! This a perfect addition to my cheesecake selection. Try some out this holiday season, they will store for up to a month in an airtight container.
Ingredients
2 pkgs of cream cheese, softened to room temperature***use only full fat
3/4 cup of white sugar
2 tbsp of cornstarch
1 tbsp of vanilla
2 extra large eggs
1/3 cup of whipping cream
12 Mr. Christie Nilla cookies
12 Muffin Cups
 Place muffin cups in a muffin tin, fill each cup with one Nilla cookie. Set aside
Cream one package of cream cheese, 2 tbsp of cornstarch and 1/4 of sugar on low until creamy.
Scrap down sides
Blend in the other package of cream cheese and remaining sugar
Add vanilla and one egg and blend into mixture
Add remaining egg and blend
Blend in whipping cream, be sure to not over mix!
 Divide the batter into muffin tins filling them almost to the top.***Add in desired toppings jams/sauces, if adding in chocolate chips or skor bits add them in before the batter or simply decorate on top after they come out of the oven as they will make your cakes fall in the center like mine did!***
Place muffin tin in a shallow dish containing enough water so that it covers 1 inch up the sides
Bake in a preheated 350 oven for 45 minutes or until set in the centre ad light brown around the edges
Remove from oven and cool on a wire rack for 2 hours. Cover with plastic wrap and place in freezer for at least 1 hour, still in muffin tins to help maintain shape
Refrigerate until ready to serve. Decorate as desired (if at all) .... and enjoy!!!!

Ingredients
2 pkgs of cream cheese, softened to room temperature***use only full fat
3/4 cup of white sugar
2 tbsp of cornstarch
1 tbsp of vanilla
2 extra large eggs
1/3 cup of whipping cream
12 Mr. Christie Nilla cookies
12 Muffin Cups

Cream one package of cream cheese, 2 tbsp of cornstarch and 1/4 of sugar on low until creamy.
Scrap down sides
Blend in the other package of cream cheese and remaining sugar
Add vanilla and one egg and blend into mixture
Add remaining egg and blend
Blend in whipping cream, be sure to not over mix!
Place muffin tin in a shallow dish containing enough water so that it covers 1 inch up the sides
Bake in a preheated 350 oven for 45 minutes or until set in the centre ad light brown around the edges
Remove from oven and cool on a wire rack for 2 hours. Cover with plastic wrap and place in freezer for at least 1 hour, still in muffin tins to help maintain shape
Refrigerate until ready to serve. Decorate as desired (if at all) .... and enjoy!!!!
December 12, 2011
Aunt Sharon's Butter Tart Squares
Gooey little squares of goodness .... that's what you will have after you whip up a batch of these crowd pleasers. Aunt Sharon seemed to be able to pull these lovelies out of thin air and they disappeared in the bat of an eye if you weren't quick to scoop one up. While many people have had butter tart squares, Aunt Sharon had a variation that was all her own .... she added raspberry jam to the recipe one time and the rest is history. You can make these squares the traditional way but why wouldn't you add that extra little kick of raspberry**?
Ingredients - Base
1/2 cup of soft butter
1 cup of flour
2 tbsp white sugar
Kraft Raspberry Jam
Mix and press into a greased 8x8 pan and bake at 350 for about 15 minutes or until the base turns a light golden brown.
**Once cooled spread enough raspberry jam to cover the base and set aside. I suppose any raspberry jam will do but Kraft is best and it's what Aunt Sharon used**
Ingredients - Topping
2 eggs
1/2 tsp baking powder
1 1/4 cups brown sugar
3 tbsp of flour
1 tsp vanilla
Mix ingredients together and pour over the base
Bake at 350 for approximately 10-15 minutes or until the center is no longer jiggly. Let cool and enjoy!!!
Ingredients - Base
1/2 cup of soft butter
1 cup of flour
2 tbsp white sugar
Kraft Raspberry Jam
Mix and press into a greased 8x8 pan and bake at 350 for about 15 minutes or until the base turns a light golden brown.
**Once cooled spread enough raspberry jam to cover the base and set aside. I suppose any raspberry jam will do but Kraft is best and it's what Aunt Sharon used**
Ingredients - Topping
2 eggs
1/2 tsp baking powder
1 1/4 cups brown sugar
3 tbsp of flour
1 tsp vanilla
Mix ingredients together and pour over the base
Bake at 350 for approximately 10-15 minutes or until the center is no longer jiggly. Let cool and enjoy!!!
November 26, 2011
Aunt Sharon's Summer Salad
This fresh and fruity salad is the perfect finale to a summer BBQ. Many people have heard of Ambrosia Salad but the fruit is typically only mandarins and pineapple, my Aunt Sharon added in lots of fresh summer fruit and it quickly became a family classic. Even though every bite is a different flavour combination, I still remember saving all of the marshmallows in my bowl to savour at the end!!! We still make this every summer season and remember my lovely Aunt Sharon and all that she shared with us.
Ingredients
1 cup of sour cream (you can use lite if you desire, notice I didn't list it as my first choice though!)
1 cup of sweetened shredded coconut
1 cup of mini marshmallows
Chopped fresh fruit that is in season ie: Pineapple, Strawberries, Blueberries, Blackberries, Raspberries, Grapes, Bing Cherries
Add the desired amount of fruit to your salad, fold all ingredients together and refrigerate for several hours. It really is best made in the morning and left to sit until an evening meal.
Ingredients
1 cup of sour cream (you can use lite if you desire, notice I didn't list it as my first choice though!)
1 cup of sweetened shredded coconut
1 cup of mini marshmallows
Chopped fresh fruit that is in season ie: Pineapple, Strawberries, Blueberries, Blackberries, Raspberries, Grapes, Bing Cherries
Add the desired amount of fruit to your salad, fold all ingredients together and refrigerate for several hours. It really is best made in the morning and left to sit until an evening meal.
Chocolate Confetti Squares ... aka Rocky Road
These little bits of heaven remind me of Christmas baking, every year my mom had select recipes that were a must during the holiday season. I love this version of them because it is a combination of all things delicious .... Chocolate,Butterscotch and Peanut Butter!!! I have been to showers and bake sales where I instantly spot the little marshmallow dotted squares and scoop one up only to find it is just Chocolate, of course I still eat it but it's just not the same as Mom's! When I was pregnant with my son I may have indulged in this favorite a little too much during the holiday season, I wouldn't be surprised if Zac was sick of them before he even tried one lol!
Bet you can't eat just one!!!
Ingredients
1small package of Chocolate Chip (270 gr) ... of course my choice is milk chocolate
1 small package of Butterscotch Chips (270 gr)
1 cup of smooth peanut butter
1 package of small marshmallows
Melt Chocolate Chips, Butterscotch Chips and Peanut Butter in a large pot and let cool for a few minutes.
Add in the package of marshmallows folding to ensure that they are all covered with the melted chocolate mixture.
Pour into a lightly greased pan and refrigerate. You can use a 9x13 or 8x8 pan, it will just change the depth of your finished square.
Bet you can't eat just one!!!
Ingredients
1small package of Chocolate Chip (270 gr) ... of course my choice is milk chocolate
1 small package of Butterscotch Chips (270 gr)
1 cup of smooth peanut butter
1 package of small marshmallows
Melt Chocolate Chips, Butterscotch Chips and Peanut Butter in a large pot and let cool for a few minutes.
Add in the package of marshmallows folding to ensure that they are all covered with the melted chocolate mixture.
Pour into a lightly greased pan and refrigerate. You can use a 9x13 or 8x8 pan, it will just change the depth of your finished square.
November 22, 2011
Creamy Fudge
This recipe takes me back to 1982, I was in Kindergarten at Polson Park Public School in Kingston and a mom of a boy in my class shared this recipe with my mom. It was a favourite over the years but then the unthinkable happened ... we lost the recipe. I went years without this smooth, creamy fudge only to rediscover it in 1999 from a coworker's mom. I knew it had to be the same fudge because of the secret .... it's microwave fudge!!! This is the easiest fudge you will ever make and for that reason alone I figure it is healthier ... less stress :-)
Ingredients
3 cups of Chocolate Chips (I prefer milk chocolate but the original recipe is semisweet)
1 can of sweetened condensed milk (I prefer Eagle Brand Milk)
1/4 cup of margarine or butter, either will work fine
1 cup of chopped walnuts*
Place all ingredients in a microwave safe bowl and heat at medium temp until the chocolate chips are melted (3-5 minutes depending on your microwave, be sure to stop at least once and stir well)
*Add in 1 cup of chopped nuts (I use Skor Bits to change it up a bit!!!)
Pour into lightly greased 8x8 pan and refrigerate until set.
Ingredients
3 cups of Chocolate Chips (I prefer milk chocolate but the original recipe is semisweet)
1 can of sweetened condensed milk (I prefer Eagle Brand Milk)
1/4 cup of margarine or butter, either will work fine
1 cup of chopped walnuts*
Place all ingredients in a microwave safe bowl and heat at medium temp until the chocolate chips are melted (3-5 minutes depending on your microwave, be sure to stop at least once and stir well)
*Add in 1 cup of chopped nuts (I use Skor Bits to change it up a bit!!!)
Pour into lightly greased 8x8 pan and refrigerate until set.
Subscribe to:
Posts (Atom)