Are the holidays over? Are you turkeyed out but still have some of the left overs to clean up? Make some Turkey "Stoup"!!! Clean out your fridge with this quick and easy throw together stew/soup recipe that my mom always made. By using your gravy, you are sure to have a bowl full of flavor for that last turkey taste!
Ingredients
Left Over Turkey
Left Over Veggies (any and all ... except mashed tatties of course!)
Left Over Gravy
3 Carrots, chopped
3 Celery Stalks, chopped
1 onion, chopped
2 cloves of garlic, chopped
1 pkg of Chicken Stock
-Saute chopped carrots, celery, onion and garlic in a small amount of olive oil over medium heat to begin cooking and releasing all the aromas ... add a dash of salt ... remember this is a throw together recipe so taste as you go!
-After a few minutes of sauteing add half the tetra package of chicken broth and let the veggies continue to cook and soften for another 10 minutes.
-Add in the remaining chicken stock along with all of your left over gravy (a bowlful should do the trick!)
-Add in all left over veg ... we had left over roasted turnip and balsamic glazed brussel spouts so it added a whole lot of flavor!
-Add in diced left over turkey and simmer.
-Serve with a fresh round of Yorkies and enjoy!!!!
December 29, 2011
December 24, 2011
Yorkshire Pudding ... Better known as Yorkies
No British Christmas dinner is complete without a mountain of Yorkshire Puddings to add to your plate and douse with gravy! I had never made Yorkies before but contacted a high school friend who had posted about her mum's on facebook, I made them for the first time this past Thanksgiving and I will never have another turkey dinner without them! I think it was what sealed the deal for Steve and I .... he asked me to marry him about a month before my yorkie success but I think it still scored me some brownie points!
Share these with your family this holiday season, from the Switzer family to me and now from me to you!

Ingredients
1 cup of milk
1 cup of flour
2 eggs
1/4 tsp of salt
Preheat oven to 450
Mix salt and flour together
Add milk to form a smooth paste
Add eggs and beat for 2 minutes
Grease muffin pan with roast drippings and place in the oven and heat up until the pan is hot and starting to slightly smoke
Pour mixture into the muffin cups, approximately 1/2 inch deep
Place in oven and bake for 20-30 minutes, decreasing the heat as the baking is accomplished
Thanks Amy!!!
December 19, 2011
Aunt Sharon's Wife Saver Breakfast
What woman doesn't need a little saving on the busiest morning of the year? The big day is just around the corner and there is no better way to start the day then popping this "make ahead/all-in-one" dish into the oven to cook while the gifts are being opened on Christmas morning. Prepare the ingredients the night before and set it the fridge overnight, an hour in the oven is all this dish needs to be ready and cooled long before the wrapping paper is even cleaned up off the floor! One portion is more than enough to tide you over until turkey time!!!
There are many slight variations of this recipe but this is the original one that was shared with our family from my Aunt Sharon. Cheers to all the woman who plan ahead!!!
Ingredients
1 1/2 cups of milk
6 eggs beaten
1/4 cup of green pepper
1/4 cup of onion
1-2 tsp of Worcestershire Sauce
1/2 -1 tsp of mustard powder
Dash of Tabasco Sauce
Salt and Pepper to taste
16 slices of bread, crusts removed
8 slices of cooked/sliced ham
8 slices of cheddar cheese
Grease a 9x13 pan, place half of the bread slices in the pan. Cover with ham and cheese and then cover with remaining bread slices.
Combine remaining ingredients and pour over the bread
Cover with plastic wrap or foil and refrigerate overnight
In the morning, combine 1/4 cup of melted butter and 1 cup of crushed corn flakes and spread over bread. Bake at 350 for about 1 hour.
Put on your cape and get ready to save the day with this crowd pleaser!
Colette's Tourtiere
Tourtiere is a savoury double crusted meat pie that originated in Quebec and made it's way onto our dinner table from a dear family friend Colette way back in the 1980's. Colette shared the family recipe that came from her home town in St. Hubert, Quebec and it quickly became one of our favourites. This dish is full of flavour and the perfect addition to any table on a cold snowy day, share it with your loved ones and warm them up ... from the inside out! Throw in a card game of canasta, some star wars figures and cabbage patch dolls and you have a Winter's afternoon in Kingston, circa 1983!!!
Ingredients
1 lb of ground pork
1 lb of ground beef
1 onion chopped
1 cup of water
1/2 tsp cinnamon
1/2 garlic powder
1/8 tsp Cloves ***or less
salt and pepper to taste
Cook meat, onion and water for 30 minutes on stove top
Add spices to the mixture
Makes enough for 2 double pie crusts, split the mixture between each pie shell
Bake at 350 for 35-40 minutes or freeze and bake later
My Little BIG Cheesecakes
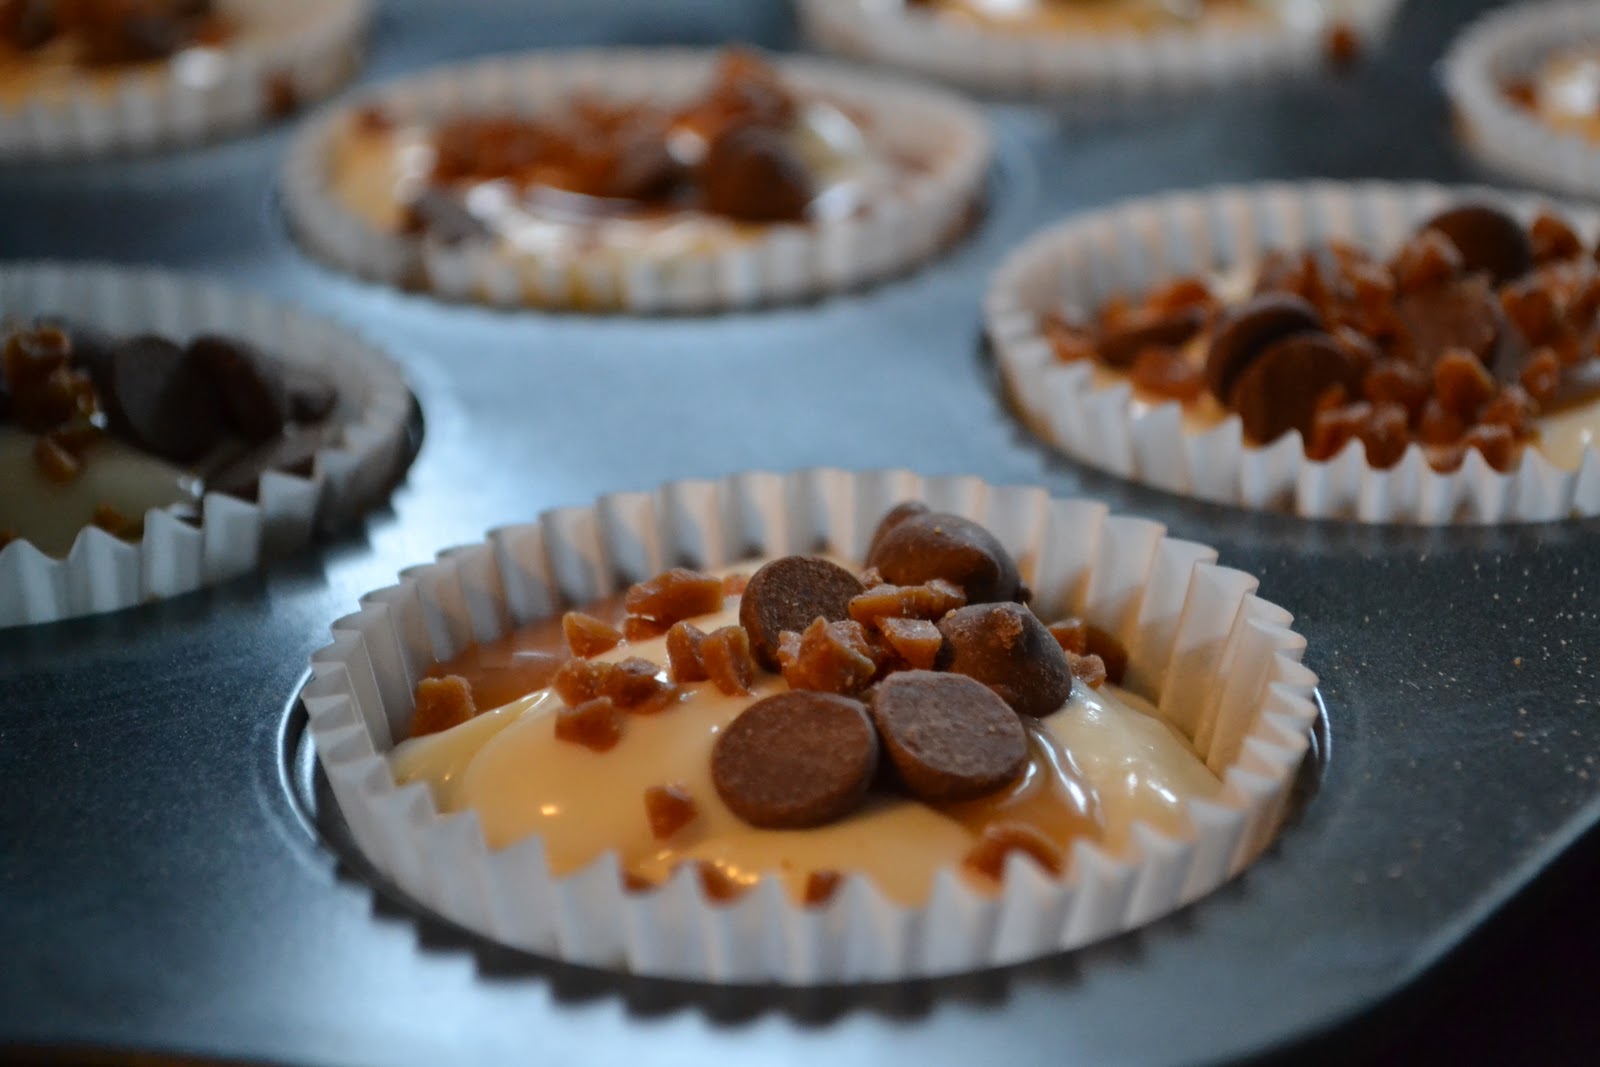
These guys might be smaller but there is no scrimping on taste!!! My Little BIG Cheesecakes are big New York style cheesecake taste packed in little muffin size servings. These are perfect for parties and gatherings that make plating and serving a traditional cheesecake somewhat difficult. Instead of a shortbread crust that can be crumbly when eaten off of a plate, I have used a round Nilla cookie in the bottom of each muffin cup. This gives you the look and feel of a crust without the mess! Any topping can be added to create variation in your menu options but be sure to swirl in jam, fruit coulis etc. to ensure even baking.
 I made these today for Steve to take as nibblies at the office tomorrow. One batch had to be strawberry just to keep it festive and the other was a simple chocolate and caramel combo. I`m hoping they are a hit but if not it means they may just make it back home at the end of the day. We sampled one of the strawberry lovelies after they had cooled and I have to say .... I am pretty excited! This a perfect addition to my cheesecake selection. Try some out this holiday season, they will store for up to a month in an airtight container.
Ingredients
2 pkgs of cream cheese, softened to room temperature***use only full fat
3/4 cup of white sugar
2 tbsp of cornstarch
1 tbsp of vanilla
2 extra large eggs
1/3 cup of whipping cream
12 Mr. Christie Nilla cookies
12 Muffin Cups
 Place muffin cups in a muffin tin, fill each cup with one Nilla cookie. Set aside
Cream one package of cream cheese, 2 tbsp of cornstarch and 1/4 of sugar on low until creamy.
Scrap down sides
Blend in the other package of cream cheese and remaining sugar
Add vanilla and one egg and blend into mixture
Add remaining egg and blend
Blend in whipping cream, be sure to not over mix!
 Divide the batter into muffin tins filling them almost to the top.***Add in desired toppings jams/sauces, if adding in chocolate chips or skor bits add them in before the batter or simply decorate on top after they come out of the oven as they will make your cakes fall in the center like mine did!***
Place muffin tin in a shallow dish containing enough water so that it covers 1 inch up the sides
Bake in a preheated 350 oven for 45 minutes or until set in the centre ad light brown around the edges
Remove from oven and cool on a wire rack for 2 hours. Cover with plastic wrap and place in freezer for at least 1 hour, still in muffin tins to help maintain shape
Refrigerate until ready to serve. Decorate as desired (if at all) .... and enjoy!!!!

Ingredients
2 pkgs of cream cheese, softened to room temperature***use only full fat
3/4 cup of white sugar
2 tbsp of cornstarch
1 tbsp of vanilla
2 extra large eggs
1/3 cup of whipping cream
12 Mr. Christie Nilla cookies
12 Muffin Cups

Cream one package of cream cheese, 2 tbsp of cornstarch and 1/4 of sugar on low until creamy.
Scrap down sides
Blend in the other package of cream cheese and remaining sugar
Add vanilla and one egg and blend into mixture
Add remaining egg and blend
Blend in whipping cream, be sure to not over mix!
Place muffin tin in a shallow dish containing enough water so that it covers 1 inch up the sides
Bake in a preheated 350 oven for 45 minutes or until set in the centre ad light brown around the edges
Remove from oven and cool on a wire rack for 2 hours. Cover with plastic wrap and place in freezer for at least 1 hour, still in muffin tins to help maintain shape
Refrigerate until ready to serve. Decorate as desired (if at all) .... and enjoy!!!!
December 15, 2011
Grandma Kerr's Bread Dressing
A turkey dinner is not complete without bread dressing. Everyone has their own variation that appears on family dinner tables and this one was passed from my Dad's Mom to my Mom and now onto me. It's not a quick recipe but it is well worth the effort, we have always baked it slow and low in the oven. You can make it ahead of time and then reheat it as dinner time approaches, we weren't ones to stuff the turkey so it requires a little more planning in terms of oven space.
Summer Savoury is the star of this dressing which can sometimes be a very difficult herb to find. I prefer the fresh kind that is found in the produce section, it's still on the stem and much more fragrant. Be sure to remove any stems and twigs that may come off with the herb leaves before adding it to any recipe. To release the flavour, grind the leaves in the palm of your hand. If you have trouble finding fresh Summer Savoury the bottled kind will do, the key to this recipe is the unique herb so no substitutions!!! Most dressing/stuffing recipes call for Sage which is lovely, but a different taste all together!
I have made this dressing for many years and have never followed a recipe, it's one of those handed down treasures that is all about look and feel! My recipe is enough to share at a LARGE family dinner, it would be best to cut the ingredients back if it's just for a smaller group. Share this dish with your loved ones and fill your house with the warm smells of the holiday season.
Ingredients
1 loaf of white bread, cubed
1 loaf of brown bread, cubed
4-5 sweet/vidalia onions chopped
1 lb of butter
1 carton of Chicken Stock
Summer Savoury
1 large aluminum roasting pan
-Cube and place bread in a large roasting pan (fill it to the top ... you won't likely use all the bread though). Season bread with salt and pepper and toss with a drizzle of olive oil. **Place in the oven at 350 to dry out the bread if it is too fresh
-Melt 1/2 lb of butter and saute chopped onions (for variations I have included mushrooms, shallots and garlic for extra flavour)
-Add in Summer Savoury, 1 to 2 "palmfuls" or rounded tablespoons to allow the flavour to infuse with the butter and onion mixture
-Add in 1/2 of the carton of chicken stock and continue cooking until the onions are soft
-Spoon over the bread cubes, mixing as you go ... don't just dump it all on at once!!!
-If you don't have enough liquid to moisten all of the bread melt some extra butter, summer savoury and additional chicken stock ... you want the bread moist enough, but not a gooey mess!
-Bake at 275-300 until golden brown .... this might take a while. Stir it around every 15 minutes or so and remove from the oven once the dressing has reached your desired "look and feel". Mine is usually anywhere from 1-2 hours depending on how much bread and liquid is used. Place in a serving dish and set aside until dinner time! Be sure to make enough for leftover dressing sandwiches .... my Dad's favourite!
December 14, 2011
Turtle Cheesecake
I made this cheesecake for Steve on his birthday in August and everyone loved it. It's a rich creamy New York style cheesecake with pieces of toasted pecans, caramel and pieces of chocolate, all covered in my Aunt Carole's recipe for Chocolate Glaze. On the bottom is my signature shortbread crust with chopped toasted pecans for added flavour.
These cheesecakes are huge, be sure to use a 9" spring form pan for best results. The first bite alone is worth the time and effort, enjoy and don't forget the rules!!!
Ingredients - Crust
1 cup of butter
2/3 cup of white sugar
2 cups of flour
1 cup of chopped toasted pecans
2 tsp of vanilla
3/4 cup of choc chips/chunks
Skor Bits
Caramel Ice Cream sauce
Wrap the outside of the spring form pan with foil, covering the bottom and sides
Cream butter, sugar and vanilla until light and fluffy
Add flour and 1/2 cup of finely chopped pecans until blended and press into a greased 9" spring form pan
Sprinkle chocolate chips, skor bits if you have them and the remaining toasted pecans on the crust
Drizzle caramel sauce (a few spoonfuls) all over the crust and set aside (unbaked)
Ingredients - Cheesecake
4 pkgs/bricks of cream cheese at room temperature **use only full fat
1 2/3 cups of white sugar
1/4 cups of corn starch
1 tbsp of vanilla
2 extra large eggs
3/4 cups of heavy whipping cream
Put one package of cream cheese, 1/3 cup of the sugar and corn starch in a large bowl and beat on low until creamy (about 3 minutes) scraping down the bowl several times. Blend in the remaining cream cheese one package at a time scraping down the sides after each one
Increase mixing speed to medium and blend in the remaining sugar and vanilla
Blend in eggs one at a time, beating well after each one
Blend in the whipping cream but be careful to not over mix
Gently spoon batter over the crust
Drizzle more of the caramel sauce on top of the batter and sprinkle with a few chocolate chips
Place the cake in a large shallow pan (I use my roasting pan) and fill the pan with water so it comes up the side approximately 1".
Bake at 350 until the edges are a light golden brown and the top is a light golden tan colour, approximately 1 1/4 hours. Remove the cheesecake from the water bath and take off the foil. Cool on a wire rack for 2 hours.
Cover with plastic wrap and refrigerate until completely cold (at least 4 hours, but overnight is best)
Ingredients - Aunt Carole's Chocolate Glaze
9 double squares of Baker's Chocolate, chopped
150 ml of whipping cream
2 tbsp of margarine or butter
1 tsp of vanilla
Heat cream and remove from heat adding chopped up chocolate
Let sit for 30 seconds
Add margarine and vanilla and stir until completely melted
Remove the outer ring from the cheesecake and place it on a wire rack with wax paper underneath, slowly pour the chocolate over the top and down the sides. Return the cheesecake to the fridge to allow the chocolate to harden.
Cut and serve with a sharp edged knife, not a serrated one. If there is any leftover cheesecake wrap it and store in the fridge or freezer to ensure none goes to waste!!!
These cheesecakes are huge, be sure to use a 9" spring form pan for best results. The first bite alone is worth the time and effort, enjoy and don't forget the rules!!!
 |
| Turtle Cheesecake |
Ingredients - Crust
1 cup of butter
2/3 cup of white sugar
2 cups of flour
1 cup of chopped toasted pecans
2 tsp of vanilla
3/4 cup of choc chips/chunks
Skor Bits
Caramel Ice Cream sauce
Wrap the outside of the spring form pan with foil, covering the bottom and sides
Cream butter, sugar and vanilla until light and fluffy
Add flour and 1/2 cup of finely chopped pecans until blended and press into a greased 9" spring form pan
Sprinkle chocolate chips, skor bits if you have them and the remaining toasted pecans on the crust
Drizzle caramel sauce (a few spoonfuls) all over the crust and set aside (unbaked)
Ingredients - Cheesecake
4 pkgs/bricks of cream cheese at room temperature **use only full fat
1 2/3 cups of white sugar
1/4 cups of corn starch
1 tbsp of vanilla
2 extra large eggs
3/4 cups of heavy whipping cream
Put one package of cream cheese, 1/3 cup of the sugar and corn starch in a large bowl and beat on low until creamy (about 3 minutes) scraping down the bowl several times. Blend in the remaining cream cheese one package at a time scraping down the sides after each one
Increase mixing speed to medium and blend in the remaining sugar and vanilla
Blend in eggs one at a time, beating well after each one
Blend in the whipping cream but be careful to not over mix
Gently spoon batter over the crust
Drizzle more of the caramel sauce on top of the batter and sprinkle with a few chocolate chips
Place the cake in a large shallow pan (I use my roasting pan) and fill the pan with water so it comes up the side approximately 1".
Bake at 350 until the edges are a light golden brown and the top is a light golden tan colour, approximately 1 1/4 hours. Remove the cheesecake from the water bath and take off the foil. Cool on a wire rack for 2 hours.
Cover with plastic wrap and refrigerate until completely cold (at least 4 hours, but overnight is best)
Ingredients - Aunt Carole's Chocolate Glaze
9 double squares of Baker's Chocolate, chopped
150 ml of whipping cream
2 tbsp of margarine or butter
1 tsp of vanilla
Heat cream and remove from heat adding chopped up chocolate
Let sit for 30 seconds
Add margarine and vanilla and stir until completely melted
Remove the outer ring from the cheesecake and place it on a wire rack with wax paper underneath, slowly pour the chocolate over the top and down the sides. Return the cheesecake to the fridge to allow the chocolate to harden.
Cut and serve with a sharp edged knife, not a serrated one. If there is any leftover cheesecake wrap it and store in the fridge or freezer to ensure none goes to waste!!!
December 13, 2011
My Love of Cheesecake
Here it is .... I am sharing my first cheesecake recipe with all of you since it is the season of giving!
I have always loved cheesecake and enjoy every piece as though it were my last. I am not sure if Steve liked cheesecake before he met me but he quickly learned that I hold a very special place in my heart for this delicious dessert and that if he were to find a way into it as well he would have to share that appreciation.
Early on I explained the rules for eating cheesecake ....
1. You must make straight cuts with your fork, top to bottom.
2. You must begin at the tip of the piece and finish at the back, no exceptions.
3. You must keep the piece standing upright on it's crust at as long as possible, no tipping.
4. You must savour each piece, no inhaling it.
5. You must eat your cheesecake undisturbed, and above all else ....
6. You must not share your cheesecake (because nobody ever follows ALL the rules!)
One night while enjoying a piece of cheesecake and a glass of wine, Steve finished his piece, walked across the room and stuck his fork into the back of my cheesecake breaking Rules 1,2,4 and 6!!! It was gone before I had a chance to realize what had just happened, certainly before I had chance to stab him as any respectable cheesecake connoisseur would do. I was speechless .... I didn't know if I should scream, cry or get angry .... all I could do was laugh with astonishment!!! I knew I had met my soul mate when I let this one slide. While he hasn't attempted this feat again, it is one of our favourite stories and as a result Steve bought me a book of cheesecake recipes and a 9" spring form pan as one of my Christmas gifts last year and I have been testing out recipes on him ever since.
My cheesecakes are based on a recipe from Junior's, a restaurant in New York that is famous for their creamy desserts. It is the smoothest cheesecake thanks to the whipping cream that is added (but not beaten) in. The crust is my own recipe, I like a shortbread bottom that adds richness and extra flavour. I hope you enjoy my final product, the Turtle Cheesecake is my own combination of flavours and absolutely sinful. Enjoy and please for my sake .... follow the rules!!!
Lesley's Feta Spread
I remember the first time I tried this spread, I was surprised by the amount of flavour in something that looked so unassuming! This mixture is packed with tangy, garlicy flavour and has made frequent appearances at our Goodberry Family Christmas parties over the past few years. It definitely doesn't fall into the category of light or low calorie but who's counting during the holiday season anyway????
Ingredients
1 cup of butter
1 cup of feta cheese, crumbled
1 pkg of cream cheese, softened
2-3 cloves of garlic, crushed (I say the more, the better!!!)
Combine the ingredients until well blended.
This will make a large enough batch to be divided .... serve one and freeze the other for the next get together!
Serve with crackers and a breath mint ;-)
Aunt Lois' Ginger Snaps
 |
| Zac and I decorating gingerbread houses, Christmas 2009 |
Ingredients
2 cups of flour**add more flour if the dough is too wet
1/2 tbsp of salt
1/2 tbsp of baking powder
1 1/2 tbsp of ginger
1 1/2 tbsp of cinnamon
1/8 tbsp of ground cloves **if desired
1/2 tbsp of ground nutmeg **if desired
3/4 cups of margarine or butter at room temperature
1/2 cup of brown sugar
1/2 cup of white sugar
1/4 of dark molasses
1 egg
-Combine dry ingredients and set aside
-Cream butter and sugar together
-Blend in the molasses and egg, continue until the mixture is lighter in colour and no longer looks curdled
-Add dry ingredients and mix well
-Section off small portions of dough using a teaspoon keeping them uniform in size
-Roll in granulated sugar and place on a cookie sheet lined with parchment paper approximately 2" apart
Bake at 350 for 12 minutes checking at 10 minutes.
Cool on rack and enjoy!
December 12, 2011
Turnip Puff
Turnip is one of my favourite veggies to accompany a turkey dinner and Christmas time is the perfect opportunity to try a new variation on and old classic. This side dish is a favourite of mine that my mom would frequently bring to large family dinners. It's light and fluffy but still has that good ol' turnip taste. I know it's hard to deviate from the norm, but step outside the box this year and try a new side dish.
Ingredients
6 cups of cubes turnip
3 tbsp of flour
2 tbsp of butter
1 tbsp of brown sugar
2 eggs beaten
1 tsp of baking powder
Salt and Pepper to taste
Cook turnip and mash, then add in the butter and eggs
Combine dry ingredients (flour, sugar, baking powder, salt and pepper) and add to turnip mixture
Once mixed pour into a greased casserole dish and bake at 350 for 25-30 minutes or until light brown and puffy. Serve warm and enjoy.
Aunt Sharon's Butter Tart Squares
Gooey little squares of goodness .... that's what you will have after you whip up a batch of these crowd pleasers. Aunt Sharon seemed to be able to pull these lovelies out of thin air and they disappeared in the bat of an eye if you weren't quick to scoop one up. While many people have had butter tart squares, Aunt Sharon had a variation that was all her own .... she added raspberry jam to the recipe one time and the rest is history. You can make these squares the traditional way but why wouldn't you add that extra little kick of raspberry**?
Ingredients - Base
1/2 cup of soft butter
1 cup of flour
2 tbsp white sugar
Kraft Raspberry Jam
Mix and press into a greased 8x8 pan and bake at 350 for about 15 minutes or until the base turns a light golden brown.
**Once cooled spread enough raspberry jam to cover the base and set aside. I suppose any raspberry jam will do but Kraft is best and it's what Aunt Sharon used**
Ingredients - Topping
2 eggs
1/2 tsp baking powder
1 1/4 cups brown sugar
3 tbsp of flour
1 tsp vanilla
Mix ingredients together and pour over the base
Bake at 350 for approximately 10-15 minutes or until the center is no longer jiggly. Let cool and enjoy!!!
Aunt Lois' Thimble Cookies
These sugar covered cookies were a favourite of mine when I was a kid especially when they were filled with homemade strawberry jam! The thimble indentation creates the perfect little pocket for the sweet gooey jam. Don't worry if you don't sew and find yourself without a thimble (we all know I don't have one lol), you can always use the end of a large wooden spoon to make the indentation. Be sure to hold the edge of the cookie when you press down to help it maintain it's shape. My Aunt Lois says this dough is a dry, compact consistency and should make little cracks around the edges when pushed down ... if it doesn't add more of the flour. Test this out before you chill the dough in the fridge. Good luck and in case you are wondering.... they are worth it!
Ingredients
1 cup of soft butter (be sure to use butter because these are like a shortbread)
1/2 cup of white sugar
4 egg - yolks only!!!
1 tsp vanilla
2 1/2 to 3 1/2 cups of flourHomemade Strawberry Freezer Jam .... yummo!!!
-Cream butter and sugar
-Add egg yolks and continue to mix, not beat
-Add vanilla and beat until fluffy
-Using a wooden spoon begin to add in flour**(minimum 2 1/2 cups, add in extra flour 1/4 cup at a time, testing dough for dryness after each addition) You might need some muscle for this so recruit some help :)
-Chill dough in the fridge for 1/2 hour. The dough should be very compact
-Section off 1" balls and roll in brown sugar placing each on a cookie sheet 1-2" apart.
-Using a lightly floured thimble or the end of a large wooden spoon create indentations in the center of each cookie being sure to hold the edges as you press down.
Bake at 300 for 10 min, remove from the oven and re-poke the indentations as they will puff up a bit with the initial baking
Return cookies to the oven and bake another 20-25 minutes
Cool on rack and fill with a dollop of jam while still hot!
Aunt Jen's Jam Jams
These sandwich style cookies take me back to Aunt Jen and Uncle Harry Wayne's kitchen where my Mom and Aunt Jen would have an assembly line set up that popped out these amazing little round cookies filled with (drumroll please) .... jam!!!! These are a tedious cookie to make and must be filled while the cookie is still hot so the flavour of the jam can set into the cookie. The fact that you get two cookies in one grab with this family favourite is yet another bonus. I'm pretty sure my dad's mouth watered the other day just at the mention of them. I am recruiting my mom to help me make some this year, enjoy!!!
Ingredients
2 eggs beaten
6 tbsp of corn syrup
1 cup of brown sugar
1 cup of butter, margarine or shortening
2 tsp of baking powder
3 cups of flour
-Cream together margarine and brown sugar
-Add eggs, corn syrup and vanilla and continue to mix
-Mix in dry ingredients
-Roll out on counter top must be thin) and cut out rounds
Bake at 350 for 5 minutes
Fill with jam as soon as you can handle them once out of the oven. Let cool and enjoy!!!
Mom's Whipped Shortbread Cookies
 |
| Zac baking cookies, Christmas 2007 |
Be sure to keep them small enough so that you can pop one into your mouth ... they are much easier to steal that way!!!
Ingredients
1 lb of butter at room temperature
1 cup of icing sugar
3 cups of flour
1/2 cup of corn starch
1 tsp vanilla
-Sift flour and corn starch together into a bowl and set aside
-Whip butter, sugar and vanilla together until light and fluffy
-Add in sifted dry ingredients and mix on low gradually increasing speed until ingredients are well combined.
-Drop by tablespoon fulls on a cookie sheet lined with parchment paper and sprinkle with coloured sugar
Bake at 300 for 12 minutes or until the slightest brown appears around the bottom edge of each cookie
Cool on rack and eat immediately!!!
Granny's JUMBO Raisin Cookies
These don't just have Jumbo Raisins in the cookies .... the cookies are JUMBO too! This is my Granny's recipe for a huge cookie filled with surprises. I must admit I like the idea of these much more as an adult but even the nuts and spices didn't stop me from enjoying them as a little girl as well! I have always been a huge fan of raisins so it didn't take much to sell me on these favourites. Be sure to keep the portions generous just like Granny used to make!
Ingredients
2 cups of Golden Seedless Raisins
1 cup of water
2 cups of white sugar
1 lb of shortening
3 eggs
1 tsp Vanilla
4-5 cups of flour**
1 tsp of baking powder
1 tsp of baking soda
2 tsp salt
1 1/2 tsp of cinnamon (a generous 1 1/2 tsp!!!)
1/8 tsp of nutmeg (optional)
1 cup of chopped raw walnuts
Prior to assembling the cookie ingredients ....
Combine raisins and water and bring to a boil. Remove from heat and let cool to room temperature. You will use both the raisins and the water so do not drain!!!!
-Combine dry ingredients (flour, baking powder, baking soda, Cinnamon, salt, nutmeg and chopped walnuts) and set aside
-Beat sugar, shortening, eggs and vanilla together until light and fluffy (note that the consistency with shortening is slightly different then that of butter or margarine)
-Add cooled raisins and liquid. Mix by hand until incorporated.
-Mix in 4 cups of the flour by hand, adding up to the 5 cups as needed for a dry cookie dough.
Drop by rounded tablespoon fulls on a baking sheet lined with parchment paper.
Bake at 350 for 10-15, until edges are golden brown. Cool and rack and enjoy!
It's the Holiday Season
Christmas has always been a very special time in our family. Each year my mom's side of the family gets together in early December to celebrate a Goodberry Family Christmas. These gatherings are always a potluck that results in the most treasured recipes making the cut to appear in the annual spread.
My Creamy Fudge and Spinach Dip have made many appearances over the years as they seemed to be my go to potluck items. I always liked taking something that was ready to be eaten and didn't require heating up.
Goody Trays were always filled with family favourites ... Chocolate Confetti Squares, Jam Jams, Thimble Cookies, Aunt Lois' Ginger Snaps, Mom's Whipped Shortbread Cookies, Aunt Sharon's Butter Tart Squares .... the list goes on and on! And of course there were the savoury items to dip and dunk into .... Hot Broccoli Dip, Mom's Cheeseball, Lesley's Feta Sread .... they are all so good, and garlicy too!!!
Family, Food and Fun along with an appearance from the jolly man in red made each and every year a special memory for all. Merry Christmas and I hope you enjoy some of these great Goodberry recipes!!!
 |
| Granny & Poppa |
My Creamy Fudge and Spinach Dip have made many appearances over the years as they seemed to be my go to potluck items. I always liked taking something that was ready to be eaten and didn't require heating up.
Goody Trays were always filled with family favourites ... Chocolate Confetti Squares, Jam Jams, Thimble Cookies, Aunt Lois' Ginger Snaps, Mom's Whipped Shortbread Cookies, Aunt Sharon's Butter Tart Squares .... the list goes on and on! And of course there were the savoury items to dip and dunk into .... Hot Broccoli Dip, Mom's Cheeseball, Lesley's Feta Sread .... they are all so good, and garlicy too!!!
 |
| Granny and a Jolly Ol' Elf |
Subscribe to:
Posts (Atom)